Grace & Favor – A Life Worth Living

Showing posts with label Around the House. Show all posts

Sunday, December 21, 2014

Christmas Mantel


I've had a pair of windows in the basement for several years and never used them for anything...until this Christmas.  I decided to bring one up and use it as the centerpiece of this years mantel.  I'm not always a symmetrical person but for some reason this years mantel came out that way.  The candles are all on timers, an incident at Christmas a few years back taught me that I can not be trusted with "real" candles in the house.


This is a closeup of the left side of the mantel.  Both of the containers were picked up at GW for nearly nothing.  The one to the far left has deer heads on the side and I believe it came from Pottery Barn.  
 

The right side of the mantel has an old ice bucket that someone painted white.  I placed amaryllis  on each side of window, the one on the left has bloomed but this one grew taller but never got a bloom.  The lettering of  "Let It Snow" was made on my Cricut and the photo of the snow bike is a canvas I had made last year.  I just used velcro to attach it to the window.

Merry Christmas Everyone.
Joining
The Scoop with StoneGable
WOW Us Wednesday 

Friday, April 11, 2014

What is it?


Do you ever read the "what is it and what is it worth" in Country Living and other publications?  That segment and the one on houses for sale are usually my favorites.  I didn't think this piece I picked up at a resale shop last week would come under "what is it"...I already know it's value isn't worth crowing about but upon closer inspection the what is it became clear.

I'm not sure where it will end up but I knew I had to have it, as it reminded me of a piece my daughter-inlaw has.  It rolled around in the back of my SUV for a week before I brought it is the house.  I was cleaning it up a little when it hit me...this is a cheese box with legs!  Do you see it???


 The bottom shelf is the box that a large cheese round comes and the top shelf is the box lid.  It looks like someone shaped the legs out of 1x2 and screwed them to the inside of the box.  How simple is that?  It doesn't look manufactured but who knows.


Rather than doing something productive around the house I kept looking at the simple construction of this piece and thought (I try not to think too often because at my age I'm not sure how many "thoughts" I can spare)  that you could use this same construction method with a hat box.  You know the ones you see at TJMaxx all the time.  One would have to beef up the construction a little because the TJ's are made from cardboard and this one is from wood but the principal construction would be the same.  I'd like to say...and here is what my hat box idea looks like but with most of my hours spent at the hospital that just isn't happening right now.

I walked around the house looking for the right venue for this piece.  I stopped first in a guest room and did the most obvious...I plopped a faux fern on the top piece.


 Next stop was my bathroom.  


Then as I was bringing the piece back to the main floor I stopped on the stair landing  for one more idea.


The piece is currently on the porch waiting for spring to arrive here in Michigan.  I think this piece may be used as a server on the porch for summer to hold plates and glassware.  

On another note...I would like to thank all who have asked about my husband.  He is progressing after a series of life threatening events and we hope to have him home by June.  Thank you again for your prayers and notes of concern.

Saturday, January 11, 2014

A White House


As I said in my last post winters are long here in Michigan and I try to embrace the clean colors of whites and creams when decorating the house.  Our home lends itself to fall colors so winter could be drab if a little punch of clean clear color were not added for the winter season.


 Out every window in our home we have beautiful views of fresh snows.  Unfortunately with the wind chills being well below zero the shots I've been taking have been from the comfort of inside.


I left the faux snow on the top of this candle holder that had been sprayed for the holidays.  Along with the twigs and greens of a leftover Christmas plant this setting gives our living room a little winter boost.


In our entry a tall two toned piece holds my display of white soup tureens.  This is a basic grouping that stays up all year round and acts as a staging background for add-ins depending on the season.  For this time of year I just leave the white pieces in place.


I do change out some of the artwork in the house for different seasons and this was what I had over the sofa for the holidays.  Since its still applicable for January and February I'll leave it in place until its time for something new for spring.  The white pillow was also left in place as it has a pretty snowflake pattern on it, this piece is special to me as it was from Dawn at Creative Cain Cabin.  Along with artwork I also change out some of the pillows around the house during the winter season.


On the mantel I still have a long garland of greens and pine cones along with a couple of small winter pictures tucked in the greens.


Even our dog Izzy fits well into our winter decor.


So my friends as I look out the window at another snowy day I wish you all a wonderful January day.

Joining
StoneGable for The Scoop
 The Dedicated House
A Stroll Thru Life
A To Z Tips & Tutorials
Savy Southern Style
Ivy & Elephants 

Saturday, September 29, 2012

Two Months Later...


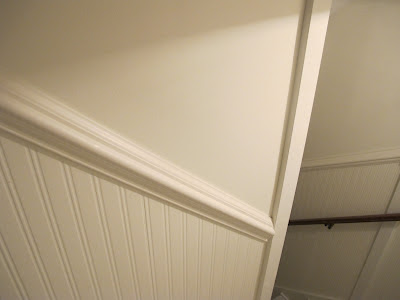
Finally...after two months this is what the stairwell to our basement looks like. I keep opening the door just to admire the change, I know its silly but the before of this project was pretty well worn out. Unfortunately or maybe a Freudian slip occurred and I just didn't take any pictures of the before.


I decided a couple of months ago that my stairwell to our basement was badly in need of an update. The carpet was awful, the wallpaper was dated and damaged and the inverted "boob" light fixture just had to go. We stripped the old wallpaper and carpeting and I patched the walls and painting everything a creamy white, this included the stairs. My first idea was to do board and batten on the walls but then I remembered in a post sometime ago that Kim from Savvy Southern Style  posted that she used a bead board wallpaper. Eureka...I was off to the store to find me some wallpaper with a faux bead board look.


The wallpaper went up with no issues, actually it was very easy to work with and the results after it was painted was pretty realistic, certainly a step up from what we had removed.  Lowes carries the bead board wallpaper for $19.99, for some reason I remembered seeing it at Menard's for $12.99 so mine came from Menard's.  I'm not sure if there is any difference in quality but I am plenty happy with what I purchased.


Next I picked out a pretty substantial chair rail and go to work figuring out the pitch that I wanted to use. This was the most difficult part of the project, compound miters don't ya know.  Let's just say that I'm grateful for the dude who invented caulk!


There is a landing on the way to our basement, as where the steps the landing was unfinished.  I found this damaged package of Pergo flooring at Lowes marked down from $45 to $7.  More than enough to cover the landing and it went down with a few snaps and some shoe molding.


The finished landing close up, it was a white washed finished, so for the unfinished steps I tried to somewhat blend the paint to match the look of the landing, eight coats of paint later I decided "its a basement stupid this looks just fine".


This is the new fixture that hangs over the landing.  I purchased a lampshade from Lowes and a hanging fixture kit and made my own fixture.  I think the total cost was around $25 and the new look is perfect.


To finish things off I left the hand rails the dark stained finished that have always been for contrast, I added a shelf from Lowes in a similar finish to give the landing a finished look.  I can't believe this project took me this long but there was a lot of downtime between each part of the project.  Today I am relieved and please with the results.

Joining

Friday, June 22, 2012

Wow, its been over a month since I last posted!  It's been on my mind but I've been up to my ears in summer projects and determined to complete them all in a timely manner.  I'm almost finished and hope to be back in the swing of things soon.

Since I'm at the "age" where a full nights sleep is just a pipe dream I spend the very early hours sitting and thinking.  Unfortunately not with any clarity about anything that will bring world peace or eliminate world hunger but still.....  During one of these early mornings I was sitting on my porch and looking at this very sad candle that had lost its grip during our recent 90 degree + days and wondering how to stop this from happening during the summer months.  Like I said...no world peace epiphany for me but I think I came up with something that may be the cure for drooping candles on a summer porch.  My disclaimer is that my porch is open air so the temperature is the actual temperature not what a hot box it would be if it were enclosed.  All I can say is if you suffer from this porch affection you might want to give this a try.


What you say is my great epiphany?????  I wrapped each of the candles in an old book page left over from another project and dang if they haven't held up straight as an arrow for the past few uber hot days.


Needless to say you wouldn't want to actually light these candles as a small house fire will usually send hubby into a small fit of hysteria.  On some of the candles I left the top showing with the color of the candle and on others I wrapped it all the way to the top.  This was just an experiment using the candles I had on hand that I was willing to sacrifice if this didn't actually work.  I used a double stick tape to close the book page around the candle and again, so far its held just fine.


So grab those droopy candles girls and start wrapping.

Wednesday, May 16, 2012

Another "Who Knew".  Its been pretty quiet here on my blog for the past few weeks as I've been busy with a project and very busy at church.  In working on my current project I realized just how many gallon cans of old paint I had stored in the basement.  I decided it was time to purge.


I went on line to see what sort of disposal options I had in our county that complied with the environmental laws.  My best option was KITTY LITTER.  According to the on line article I could dispose of the paint  through my local trash hauler by doing the following:

First order of business was to buy a bag of kitty litter. What I purchased was enough to do many many gallons of paint so I would suggest starting with a smaller bag unless you have kitties in the house.  The cheapest stuff you can find will work.


I dumped enough kitty litter into each gallon to mix into the paint so there was no liquid left showing.  I mixed it up with a garden trowel until it was the consistency of oatmeal.  The directions said to leave it sit with the lid off for 12 to 24 hours. You'll want to make sure you put this somewhere that the kids and animals won't be curious enough to get into it.


 The next morning the paint was hard as a rock and ready for disposal.  The instructions also indicated that you should leave the lids off when placing the cans into your trash can so that the hauler will know you had complied with the required method.  If you've got old paint cans sitting around check with your county/parish and see if this method is acceptable for disposal. 

Now the workshop is rid of half a dozen cans of old paint and I can continue with my current project.  More to follow on that in the next few days.


Saturday, April 14, 2012

Shades of a different color

I have a friend who has a wonderful chandelier that she has decorated with several different styles and prints of mini shades.  I've kept this idea in the back of my mind to try in my home and I've been on the lookout for shades as I travel to my local thrift shops but without any luck.

 As of last week my quest was complete and here is the results.


 While I was visiting another friend in Arkansas a few weeks ago I happen upon four country print red shades in a little shop.  All four of them were only $6 and they were in perfect condition so I picked them up as the start to my chandelier shade quest.


Then last week when I returned to Michigan I stopped at Tuesday Morning and boom there were a new shipment of mini shades just sitting there waiting for me.  I was so excited and the pricing was fabulous at $3.99 per shade.


The rooster shade just made my heart go pitter patter.  I love the washed out look and he looks perfect in my kitchen eat in area.  There were four of these available so I grabbed all four and really didn't feel guilty at all that I was depriving anyone else of these little gems.


Next to the rooster shades on the shelf were four of these french writing shades, at least I assume its french writing.  Anyway....the four red country shades plus the four rooster shades and these four french writing shades gave me the twelve shades I needed to complete my eclectic looking chandelier and I went skipping out of Tuesday Morning knowing these were looking to look great in my kitchen.

Because of the pop of red the chandelier looks great both during the day and also in the evening. This picture looks washed out but the patterns on the shades comes through clearly in person. 

Joining

Sunday, March 04, 2012

Guest Room

I picked up a piece of furniture at Goodwill for a guest room that was lacking room for a guest to store their clothes when visiting.  There is a nice large closet in this room but somehow I've filled it with overflow clothes of mine...rolling eyes.  I'm the kind of person who fills each room with "stuff" and it just doesn't leave a lot of space for the practicality of having guests actually USE the room.  This little wardrobe should be of help.


Welcome to the winter guest room which is painted in a dark putty color and white trim. 


Isn't this a cute piece?  I love the petite size and the fact that it have five drawers and also room for hanging pieces.  It has casters but I haven't decided if I'm going to put them back on or not so right now it sits directly on the floor.  Click here for a little more information about this piece


I added the medallion to the otherwise plain door.  I had thought of doing a transfer of a french saying but settled on the more traditional choice.  I also added new knobs to the piece, the ones that were on it were plastic.


This is the inside of the hanging part of the piece.  


Inside and attached to the top of the piece is a pull out rack for hanging clothes.  I added a tassel and instruction tab to the piece since the rack is painted the same color as the inside of the piece and isn't really noticeable.


I'm not sure what will end up on the top of this piece when spring comes but for now this is what I have.  The lamp I made years ago for this room out of a silver coffee server.


 I picked up this chair at GW too, it really is a pretty piece, the light today is terrible with so much snow reflection so you'll have to take my word for it.  There is a star pattern in the fabric that lends itself to this room.

A place for a guest to hang their hat for a few days visit.


If you're ever in my neck of the woods there will always be a room available for you.  

Saturday, January 21, 2012

C. Crawford Hollidge of Boston

I picked up a small piece of furniture a few weeks ago that I'm going to use in one of the guest rooms for a small wardrobe for visitors.  Since we don't have walk in closets in this house closets are at a premium and bulging with clothes therefore leaving no room when guests arrive.  This small piece will hold some clothes in the five small drawers and then hanging pieces in the wardrobe side.  I think it must have been made for a child's room just by the size of it. 

The manufacture is C. Crawford Hollidge, I've done a little research on this and found it was a department store in Boston.  This piece is by no means a fine piece of furniture but is unusual and I can't wait for the paint to dry so I can "present it to the room".  I'll have a picture of the finished piece in the next day or so, I didn't see any need to do one more tutorial on painting furniture so I've skipped all the before pictures and will just show the after. 

I'm thinking about using some wallpaper in the interior of the drawers and to line the hanging wardrobe and it needs some new knobs so I'm off shopping this afternoon to see what I can find.  If you know anything about this company and or its furniture I'd love to hear from you.

Saturday, January 07, 2012

The Christmas Clock

I had a wonderful Christmas this year; our whole family was together including our daughter in law's parents and her siblings who have become our extended family. Coming from a very small family myself I always enjoy large gatherings for any occasion and Christmas is so special where you have so many to share it with.  We all opened our gifts together this year so you can imagine the chaos of two families of gift givers handing out and receiving packages at the same time; it was a bit confusing to keep track of everyone's treasures with wrapping paper flying everywhere.  At one point I saw a very large clock coming down the stairs and my son's mother in law Kathy helping get it to the landing. I thought that Dustin and Katie (my son and daughter in law) had given Kathy this beautiful piece that we had both admired when we were shopping together a couple of months ago.  I then realized after a couple of seconds of clock gift envy that being the generous people they are, Kathy and Jim had gotten the clock for me.

The clock now hangings on the lower steps of our staircase to the second floor. I thought it would be going on the upper stair wall but I finally settled on the lower one right under a shelf.  It will make it easy to change the battery and the time when necessary and it just seemed to "fit" there.  As you have come to expect my photography skills have not improved and these shots were exceptionally hard to get because of the angle and the glare from the big windows on the second story.  You'll just have to take my word for it that this pieces looks beyond fabulous in its new home.


This is a large piece and it was hard to try and get a picture that hinted at the actual size, it stands 4' tall and 2 1/2' wide.  Our entry is open to the second floor when you come in the front door so it really does take larger pieces to make a statement there.  I think my new clock fits the criteria to perfection.