This is the finished product which resides in a guest room. The color of the wall is a much deeper mud color but with the sun pouring in the room I couldn't get a good adjustment on it.
This project was a deconstruction and then reconstruction because the new shade required a harp, the old one just clamped over the bulb. When I wired it initially I should have just put the harp base on the socket just in case I would ever need it. Moving forward I won't make this mistake again and I recommend if you try this project wire it as though the lamp shade will require a harp whether it does or not.
This was the top of the shade that required the harp assembly be added.
My instructions for this project are general as it will depend on the type of vessel you are using to make your lamp, your local big box store should have all the parts needed for just about any wiring project such as this one or some hobby stores such as Hobby Lobby may also have what you need. If not look for a lighting specialty store to get any specific parts needed. Look around your house or thrift shop for unique objects that could easily be turned into lamps.
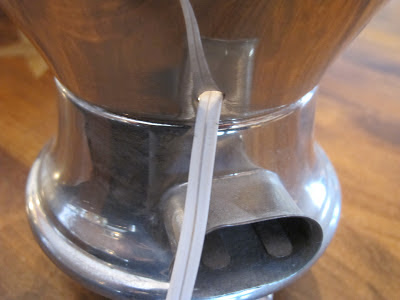
I purchased a cord kit that already had the plug assembly attached, its the easiest way to get started. I drilled a hole in the back of the coffee urn and pulled the end of the cord up through the urn and set to attaching it to the socket assembly. Very often you can find all the parts needed in a lamp wire assembly kit. These usually the the cord, socket assembly and one or two sizes of the threaded rod. This example is similar to what I used, again depending on what item you want to wire for a lamp you may need something different.
I fed the wire through the base of the urn up through the lid, this particular urn had a glass knob on the top that screwed off so I didn't need to do any addition drilling to bring the wire up through the top, I just unscrewed the knob and purchased the needed filler parts to allow the socket assembly to sit securely on the urn lid.
All I needed was one piece to transition from the coffee urn lid to the socket base.
Wiring the actual socket was a snap, there will be detailed instructions on your lamp wiring kit to complete this portion of the project. All you'll need is a screw driver and wire strippers to take off a small section of the wire casing to expose the copper wire.
This was the finished wiring and assembly of my lamp kit including the addition of the harp. To attach the lid and lamp assembly permentently to the urn base I used my go to craft glue E6000.
. Today the lamp is back in the guest room with a brand new shade, this project probably took half an hour to complete including the disassembly. Its a simple inexpensive way to add something unique to your home.
Joining


9 comments:
Char what a great lamp and good for you getting it all rewired. Love the toile shade, its simply perfect and such a great price.
LOVE it!!! Come to SC and help me!!!
That looks great and you sure made it look easy. :)
I love it!!! You can't buy things like this. Your coffee urn lamp is a real treasure.
Now, I want to find a coffee urn and copy cat this. I really love the way it turned out and you make this project look like something I could do. Wonderful!
What a lovely project. Your lamp is a treasure and you can take credit for making it. Very unique and lovely. The lamp shade is very pretty with it.
What a great idea, I love the lamp!
Jeannie
The French Hen's Nest
I'm so impressed! It's just lovely. Love the shade. Thank you for sharing this at the Make it Pretty Monday party at The Dedicated House. Hope to see your prettiness again on Monday. Toodles, Kathryn @TheDedicatedHouse
I love this lamp! I'm definitely keeping my eyes open for a coffee urn while thrifting. Your tutorial encourages me to think that I can make a beautiful lamp, too!
PS - Love the new shade!! Lucky find!
Post a Comment